What is a course?
by R. Niehoff
Before you are going to create your first own course you should know something about the fundamentals. What is a course? I think, "course" is not a very good identifier, perhaps it would be better to call it "scenery". But let's keep the usual name. A course consists of 4 components:
- 1. The elevation structure
- 2. The terrain covering
- 3. The objects
- 4. Some common parameters.
Creating a course is nothing else than defining these 4 components.
1. The elevation structure
A plane scenery is quite boring and you will agree with me that we need mountains and valleys. But how to describe this elevation structure? There are different ways and Tuxracer uses the most common and easiest method: the scenery is divided in a grid of heightpoints. Since the list of height values represents only discrete points the areas between these points are interpolated by covering the surface with triangles. The heightpoints are the edges of the triangles. Why triangles and not other polygons? A triangle is the only poygon that's always plane; all other poygons can be contorted. Contorted polygons can't be handled by OpenGL and they don't allow to calculate the height level at all points of the scenery.

We might propose to write all heightpoints in a sequential list, but that would be unreasonable. Remember that even a small scenery needs more than 20.000 heightpoints for a detailed elevation description. No, a better way is to paint a heightmap, each pixel represents a heightpoint. A heightmap is a grayscale bitmap with values from 0 (black) to 255 (white) where black is the deepest and white is the highest point in the scenery. The program reads the heightmap and generates the required list of heightpoints after scaling all grayscale values (see chapter 4 below). We can use any graphic program for creating the heightmap.

For a proper and smooth motion Tux needs a track without acerb bumps. So the blurring tool is one of the most important painting tools. Actually we should prefer a smooth brush for the elevation bitmap and avoid a hard-painting pencil.
The following pictures shows a typical heightmap. Course: "First Slide".

2. The terrain
Up to now the scenery with its heightpoints and triangles is unvisible though a real landscape with mountains and valleys exists. To make the secenery visible we have to cover the triangles with textures, we can compare this with papering a glass wall. The texture bitmaps are quadratic, so each tile covers two adjacent terrain triangles.
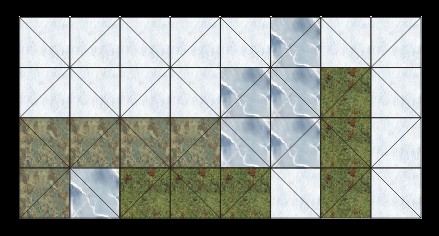
We can assign each tile to a heightpoint though the heightpoint is not the center of the texture quad. But that's unharmful, more important is the fact that we can use another bitmap for texturing the terrain, the terrainmap. This bitmap must be of same size as the heightmap, and each pixel stands for a texture tile. The color of the pixel specifies the kind of texture. The following picture shows the same part of the course as the picture above but with the color codes of the different terrains. For example, white provokes snow texture, black provokes ice and green a kind of grass texture.

Here the terrainmap of the course "First Slide":

3. The objects
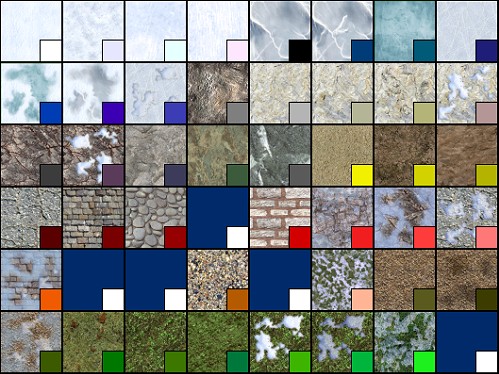
Without elements like trees, herrings, flags, houses etc. the scenery would appear empty and desert. These elements are called "objects"; they are placed at the designated positions on the surface. Again we have to ask: how can we define the objects? The first answer might be: let us use a third bitmap, corresponding to the heightmap and terrainmap. Indeed, Tuxracer 0.61 as well as PPRacer and ETRacer use this method ("trees.png"). Each object apears as a colour-coded pixel on a black map. The x and z coordinates are calculated from the pixel position, and the y coordinate (height) is computed from the triangulated elevation structure.
No doubt, this technique works well and is convenient but has some disadvantages:
Such an objectmap can only contain the information about the position. In the case that the object touches the surface at a small point (e.g. trees, flags ...) it will be enough information, but what about larger objects like houses or bridges? Those objects have to be adjusted to the terrain, that means they must be scaled, rotated and perhaps displaced. These parameters can't be defined in a bitmap. - Even if we use only the point-orientated objects of Tuxracer 0.61 it will be expedient to rotate them, especially the trees to avoid interferences. Sure, it was possible to rotate them at runtime, but that must be done at random, not a good way to get reconstructable conditions.
A more powerful method is to store the parameters in a textfile. Each item (= object instance) gets its own entry, and in respect of the parameters there are no limits. Unfortunately this method has some disadvantages, too. It is almost impossible to enter all objects manually in a textfile. So Bunny Hill can read both and generate a textfile ("items.lst") from an objectmap. Once an item list has been generated it will be used in the future, and the objects can be permanently adjusted (rotated, skaled etc.) in this list. Of course, that must be done manually. Anytime, a course editor will assume this task.
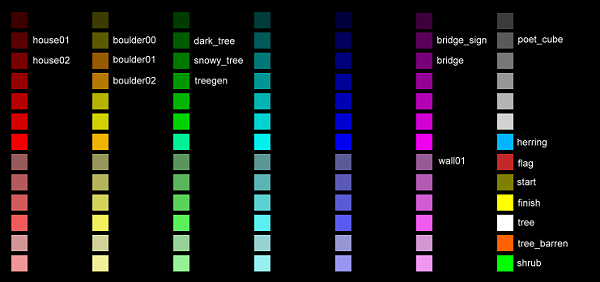
The objectmap of the course "First Slide". The course contains a lot of objects, most of them are trees.

And a short section of the items list:
*[name]finish[pos] 55.3 0.0 -950.0 [scale] 6 4 4
 [rotation] 0 0 0 [translation] 0.0 0.0 0.0
*[name]green_tree_dark [pos] 67.3 0.0 -998.0 [scale] 7.9 7.9 7.9
 [rotation] 0.0 55.4 -9.2 [translation] 0.0 0.0 0.0
*[name]house01 [pos] 40.8 0.0 -994.0 [scale] 3.0 3.0 3.0
 [rotation] -5.0 45.0 0.0 [translation] 0.0 0.0 0.0
*[name]green_tree_dark [pos] 75.5 0.0 -992.0 [scale] 8.1 8.1 8.1
 [rotation] 0.0 79.9 8.2 [translation] 0.0 0.0 0.0
*[name]house02 [pos] 61.2 0.0 -990.0 [scale] 3.0 3.0 3.0
 [rotation] -5.0 70.0 0.0 [translation] 0.0 0.0 0.0
*[name]green_tree_dark[pos] 30.6 0.0 -988.0 [scale] 9.0 9.0 9.0
 [rotation] 0.0 54.5 -6.4[translation] 0.0 0.0 0.0
4. Common parameters
The common parameters are independent from the location on the course, they concern the course as a whole. These params are defined in the textfile "course.par" ("course.tcl" in Tuxracer).
First the size parameters:
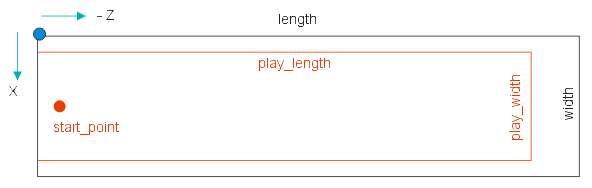
Length and width of the course are not the same as the length and width of the bitmaps! A course can be arbritary scaled though the best scale factors are 2.0 ... 3.0. Lower factors make the course bumpier, and with higher factors we lose details. Very important is the course length. This value defines the unvisible finish line where the race and time-counting stops. Usually we make this line visible by placing a finish gate at this z-position. Contrary to Tuxracer or ETRacer Tux doesn't stop abruptly at the finish line, so there must be enough space behind the line for the runout. Play_length should be 30 ... 50 lesser than length.
Example:
play_length = 960
width = 100 (50 pixels on the bitmap, factor 2.0)
play_width = 90
start_point = 50.0 4.0
The scale parameter defines the height scale (the value of elevation). The grayscale values from 0 to 255 are not absolute but can be adapted. Usual values are between 8.0 and 30.0. With extreme high values we might shape high mountains but the scenery would be very coarse and bumpy then.
The angle parameter defines the gradient of the course. The higher this value the faster Tux moves down the track. For Tuxracer 0.61, PPRacer and ETRacer this was the only way to control the basic speed but Bunny Hill uses an additional speed parameter that emulates the angle. With the speed parameter the course angle can be constantly 15°, that makes the adjustment of houses and bridges easier, and the angle of view for the skybox is always the same.
The challenge parameters are only used if the course is part of a campaign. Here we define how many herrings Tux has to catch and how much time he has to do his job. Both parameters contain 3 values for the levels easy, medium and difficult.
Now the keyframe parameters. There are 4 situations where the program activates a keyframe:
[start_keyframe] This is the frame before Tux starts
[success_keyframe] The frame at the end if the race was successful
[failure_keyframe] The same, but for the case that the race wasn't successful
[final_keyframe] Again the frame at the end, but only in training mode without challenge
Finally the description parameters [name] and [desc]. They are not important for the procedure and only used to give some information in the menus.
As an example the course.par of the course "First Slide". Size of the bitmaps: 500 x 50.
[name] First Slide
[desc] Tux' first attempt to explore the world while sliding on his belly

[width] 100 [play_width] 95 [length] 1000 [play_length] 950
[angle] 15 [scale] 20 [speed] 10.0
[startpoint] 47.0 -3.5

[herring] 30 35 40
[time] 100 90 80

[start_keyframe] tux_walk.lst
[success_keyframe] tux_joice.lst
[failure_keyframe] tux_sad.lst
[final_keyframe] tux_wait.lst